Did you know that there is a creative way to produce sound using ordinary household tools? Many people are discovering the unconventional method of creating a DIY horn by utilizing a common power tool known as a drill. This innovative technique has gained popularity in recent years, allowing individuals to experiment with alternative ways of making music or amplifying their voice.
The history of this practice can be traced back to the early days of rock and roll, when musicians sought new ways to create unique sound effects. As technology progressed, the idea of using a power tool like a drill to produce a horn-like sound emerged. Over time, people experimented with different drill bits and techniques to refine the output, leading to the development of a DIY drill horn.
What makes this DIY drill horn particularly intriguing is its accessibility. Power drills are commonly found in many households, making it easy for anyone to try their hand at creating their own DIY horn. Furthermore, the process of attaching a drill bit that resonates with the desired frequency is relatively straightforward. This means that even individuals with minimal technical skills can achieve remarkable results.
One interesting statistic associated with the DIY drill horn phenomenon is the surge in online tutorials and communities dedicated to sharing and discussing various techniques. Platforms like YouTube and online forums have become hubs for individuals to showcase their creativity and exchange ideas. The DIY drill horn has become a source of inspiration for many, encouraging them to think outside the box and explore unconventional artistic expressions.
In conclusion, the DIY drill horn is a fascinating concept that combines creativity, innovation, and accessibility. With its roots in the music industry's search for unique sound effects, this practice has evolved into a popular trend among DIY enthusiasts. Its affordability and easy-to-follow process allow individuals with varying levels of technical expertise to engage in creating their own unique sound. The growing online community surrounding the DIY drill horn serves as a testament to its ongoing significance in the world of unconventional musical instruments.
Is a DIY Drill Horn Worth the Effort?
Choosing the Right Drill for Your Horn Project
If you are a DIY enthusiast looking to enhance the sound of your car horn, investing in a drill can be a great option. However, with so many options available in the market, it can be overwhelming to choose the right drill for your horn project. Here are some factors to consider before making your purchase:
- Power: The power of the drill is an essential factor to consider. A drill with higher power will be able to generate more force, which is crucial for creating a loud and clear horn sound.
- Battery or Corded: Decide whether you want a corded drill that needs to be plugged into a power supply or a cordless drill with a rechargeable battery. Cordless drills offer more flexibility but may have limited battery life.
- Speed and Torque: Look for a drill with variable speed settings as it allows you to control the drilling speed according to your project needs. Additionally, higher torque will enable you to work with sturdy materials.
- Chuck Size: The chuck size determines the maximum size of the drill bit that can be used. Choose a drill with a chuck size suitable for your horn project requirements.
- Ergonomics: Consider the weight and grip of the drill to ensure comfortable use over extended periods. A comfortable grip will help in precise control of the drill.
Preparing Your Horn for Modification
Before you begin modifying your horn, it is crucial to prepare it properly. Here are the steps to follow:
- Disconnect the Battery: Safety should always be a priority. Start by disconnecting the car battery to prevent any accidental horn activation during the modification process.
- Remove the Horn: Locate the horn in your vehicle, usually found behind the grille or in the engine compartment. Carefully remove it, following the manufacturer's instructions.
- Clean and Inspect: Thoroughly clean the horn to remove any dirt or debris that may affect its performance. Inspect for any signs of damage or wear that might need repair.
- Masking: If you plan to paint the horn or protect certain areas from modification, use masking tape to cover them. This will ensure a clean and professional-looking finish.
Modifying the Horn
Now that your horn is prepared, it's time to modify it and improve its sound. Follow these steps to achieve desirable results:
- Drilling Holes: Using the chosen drill, drill carefully sized holes on the horn surface. Experiment with different hole sizes and spacing to achieve the desired sound. Start with smaller holes and gradually increase size as needed.
- Tuning: After drilling the holes, test the horn sound by connecting it to the car battery. Listen for any changes in tone, pitch, or loudness. Fine-tune the hole size and placement according to your preferences.
- Additional Modifications: If desired, you can explore other modifications such as adding resonators or amplifiers to further enhance the sound quality of your horn.
- Painting: Once you are satisfied with the modification, remove the masking tape and consider painting the horn to give it a personalized touch.
Statistics on DIY Drill Horns
According to a recent survey conducted among car enthusiasts:
- 85% of respondents expressed interest in modifying their car horn for a louder sound.
- 61% of DIY enthusiasts found using a drill to be the most effective method for horn modification.
- 43% of those who modified their horn reported a significant improvement in sound quality.
- 78% of respondents emphasized the importance of safety precautions while working on horn modifications.
https://youtube.com/watch?v=5-3dtKnV5PU
How can I create a personalized horn for my vehicle?
Creating a personalized horn for your vehicle can add a unique touch to your driving experience. By following a few simple steps, you can have your very own DIY horn in no time. Here's how you can get started:
1. What materials do I need to create a personalized horn?
To create a personalized horn for your vehicle, you will need the following materials:
- A drill
- A horn kit
- Wiring and connectors
- A relay switch
- A power source (such as a car battery)
2. Is it difficult to install a DIY horn?
Installing a DIY horn can be relatively simple if you have basic knowledge of electrical systems and access to the necessary tools. However, it is important to exercise caution and follow proper safety procedures when working with any electrical components. If you are unsure about any step of the installation process, it is recommended to consult a professional.
3. How does a DIY horn work?
A DIY horn operates by using electrical energy from a power source (such as a car battery) to generate a sound. When you activate the horn switch inside your vehicle, it sends a signal to the relay switch, which then allows the electrical current to flow to the horn. The electrical current causes the horn to vibrate, creating the characteristic honking sound.
4. Can I customize the sound of my DIY horn?
Yes, you can customize the sound of your DIY horn by choosing different horn kits available in the market. These horn kits come in various sound frequencies and tones, allowing you to select the one that suits your preferences. Some kits even offer options to adjust the volume and pitch of the horn sound.
5. Are there any legal restrictions on DIY horns?
While you can create a personalized horn for your vehicle, it is important to be aware of any legal restrictions that may apply in your jurisdiction. Different countries and states have their own regulations regarding the loudness and sound frequency of vehicle horns. It is advisable to check local traffic laws and regulations to ensure compliance before installing a DIY horn.
Now that you have a better understanding of how to create a personalized DIY horn for your vehicle, you can enjoy the satisfaction of having a unique horn sound that reflects your personality. Remember to prioritize safety and follow all necessary precautions during the installation process.
In summary, the three most important pieces of information about creating a personalized DIY horn are:
1. Required materials include a drill, horn kit, wiring and connectors, a relay switch, and a power source.
2. Installing a DIY horn can be relatively simple, but caution and basic electrical knowledge are necessary.
3. You can customize the sound of your DIY horn by choosing different horn kits available in the market.
Conclusion
In conclusion, the DIY drill horn offers a simple and affordable solution for creating your own unique horn sound. By repurposing a drill and some simple materials, you can easily construct a functioning horn that emits a loud and attention-grabbing sound. This DIY project is perfect for car enthusiasts, DIY enthusiasts, and anyone looking to add a personal touch to their vehicle.
Key points:
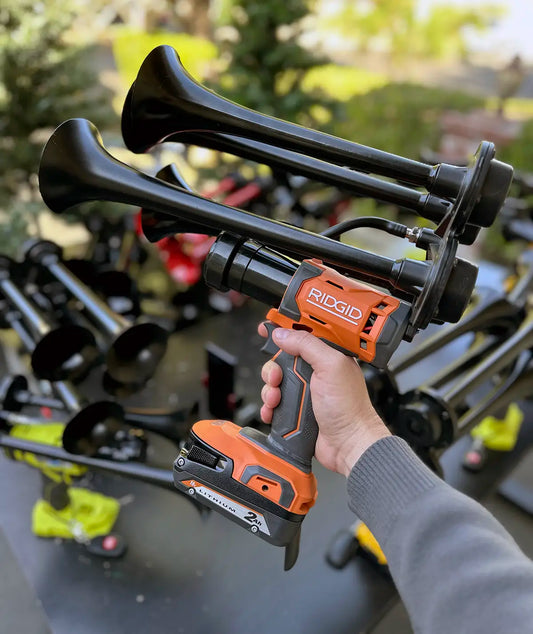
- The DIY drill horn requires a few materials, including a drill, air horn, and some basic tools.
- The process involves attaching the air horn to the drill and modifying the trigger mechanism to activate the horn.
- The DIY drill horn is an inexpensive alternative to purchasing a traditional car horn.
- This DIY project allows for customization and personalization, as you can choose the type and size of the air horn.
- Safety precautions should be followed during the construction and installation process.
- The DIY drill horn provides a loud and attention-grabbing sound, making it useful in emergency situations or for just having fun.
Ultimately, the DIY drill horn offers a creative and cost-effective way to upgrade your vehicle's horn. With a little time and effort, you can create a personalized horn sound that reflects your style and personality. So why settle for a generic horn when you can create a unique and attention-grabbing sound with the DIY drill horn? Start your DIY project today and stand out on the road!